Skip to content

Ubuntu Backup mit Back In Time

Back In Time ist ein Linux-Programm für die verhältnismäßig einfache Datensicherung des persönlichen Verzeichnisses (Home-Directory). Vorbild für Back In Time war Time Machine von Apple. Damit lassen sich Dateien sichern und aus jedem vergangenen Zeitpunkt wiederherstellen. Ähnliche Programme für Linux sind TimeVault und das Flyback. Back In Time wurde von Dan Oprea entwickelt.

Backupstrategien

Bei einem Backup sind für bestimmte Einsatzbereiche unterschiedliche Vorgehensweisen angebracht. Auf einem Serversystem oder bei einer Datenbank sind andere Maßnahmen notwendig als auf dem heimischen Desktop oder Notebook (vgl. dazu Sonderfall Privatnutzer). Einige Vorüberlegungen sollten immer angestellt werden, auch in unserem Fall der privaten Datensicherung.

Hier geht es vor allem darum, Datenverlust vorzubeugen und das System wiederherstellen zu können, falls die Festplatte den Geist aufgibt oder ein schwerwiegender Systemfehler auftritt. Zum einen sollen persönliche Daten und Dokumente wie Fotos, Musik oder Textdateien gesichert werden; zum anderen wäre es schön, wenn sich ein kaputtes System aus dem Backup heraus wiederherstellen ließe. Unter Ubuntu und anderen Linux-Systemen ist dies verhältnismäßig einfach zu bewerkstelligen.

Bevor ich auf Back In Time eingehe, noch ein Wort zur Hardware: Je nach Datenmenge, d.h. Gesamtgröße der zu sichernden Daten, wird auf andere Medien gesichert. Bei den heutigen großen Datenmengen reichen CDs oder DVDs kaum noch aus, so dass externe Festplatten das bevorzugte Medium darstellen, zumal diese im Verhältnis zur Kapazität immer günstiger werden. Weil auch ein externes Laufwerk kaputt gehen kann, können besonders wichtige Daten zusätzlich auf eine DVD gebrannt werden. Perfektionisten gehen nach dem aufwändigen Generationenprinzip vor.

Und natürlich existieren für anspruchsvollere Nutzer viele weitere Möglichkeiten, etwa Client-Server-Applikationen und Online-Backup-Dienstleister. Aber dies nur am Rande.

"Ubuntu Backup mit Back In Time" vollständig lesen
Installing gitosis on Ubuntu 8.04 LTS

This is supposed to be more like a reminder to myself, should I ever need to install gitosis on a server again. I carefully followed all the steps described here and here (German) on my Ubuntu 8.04 LTS server. But when it came to pushing my first project to the repository, git failed with ERROR:gitosis.serve.main:Repository read access denied

Turned out that none of the hooks in repositories/gitosis-admin.git/hooks/ was executable. A simple $ sudo chmod +x * solved the problem for me. Now, everything seems to be working fine.

Portable Linux Apps

Back in the days when I was still a Windows user, portable apps where a good way of carrying current versions of my favorite tools with me on a USB stick. Now, this is also possible on most Linux variants with Portable Linux Apps.

Part of the Portable Apps website

There are already more than 50 apps you can put on your USB stick, just remember to make them executable. This is not only great if you want to run the application on any desktop, but it also comes in handy if you want to test out a nightly build without really installing it on your system. The latter remains stable, while the former hast got everything it needs to run contained in itself.

If you run into trouble there's a forum, too, where you can ask for help or request a new package - however there's not much happening there yet. But since everything is so dead easy, it should just work. At least on Ubuntu 10.04, OpenSUSE 11.2, and Fedora 12. You might want to use a LiveCD of one of these distributions if you're on a different system.

Nativer Spotify-Client für Linux

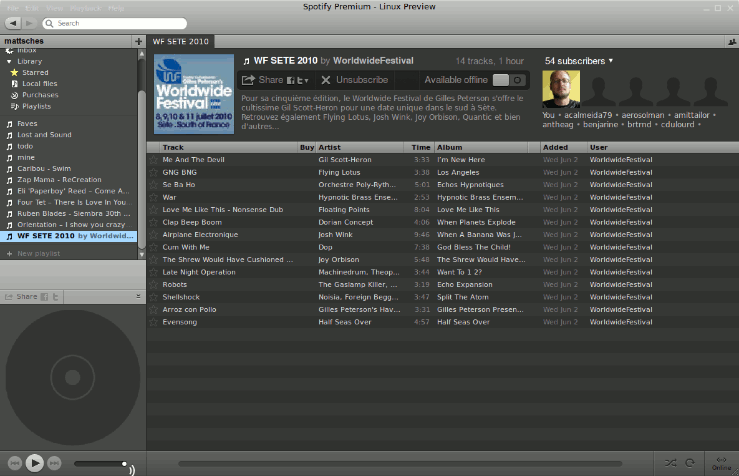
Screenshot des Spotify-Clients (skaliert)

Spotify, mein bevorzugter Musik-Streamingdienst, hat auf die Forderungen nicht gerade weniger User reagiert und vorgestern eine erste Vorschau-Version von Spotify für Linux veröffentlicht.

Das berichtet u.a. das Ubuntu-Blog OMG! Ubuntu, wo sich insbesondere nützliche Hinweise zur Installation finden. Auch bei Spotify sind die einzelnen Installationsschritte für Ubuntu 10.04 bzw. Debian Squeeze aufgeführt. Das neue Programm, das sich allerdings nicht ganz nahtlos in den GNOME-Desktop einfügt, ist momentan nur für Premium-Kunden nutzbar. Die werbefinanzierte Variante scheitert noch an der problemlosen Integration der Werbeanzeigen.

Das Programm läuft bei mir gut und stabil, lediglich der Lautstärkeregler funktioniert nicht. Das kann aber daran liegen, dass ich spotify-client-gnome-support wegen einer falschen gconf2-Version nicht installieren konnte. Alle anderen Features wie Facebook- und last.fm-Anbindung scheinen aber schon zu laufen.

Nach einer gelungenen Android-App gibt es Spotify nun also auch für Linux, allerdings immer noch mit einem Problem: In Deutschland kann Spotify leider bis auf wenige Ausnahmen nicht oder nur über (semi-legale?) Umwege genutzt werden, da sich Spotify und die GEMA bisher nicht über Finanzierung und Abgaben einigen konnten.

Ich blogge hier trotzdem auf deutsch darüber, weil ich weiß, dass das Interesse hierzulande groß ist. Die Positionen beider Seiten, also sowohl von Spotify als auch von der GEMA sind nachvollziehbar, selbst wenn man dem Verhalten der GEMA kritisch gegenübersteht. Ich hoffe, dass hier bald wieder Bewegung in die Sache kommt. International positionieren sich mittlerweile diverse Angebote, die gegen Spotify mit teilweise ähnlichen, aber auch mit grundsätzlich anderen Finanzierungsmodellen antreten wollen. Je mehr Anbieter erfolgreich sind, umso stärker wird auch der Druck, in Deutschland eine Lösung zu finden.

Update: Das Problem mit der gconf2 ist mittlerweile ganz offensichtlich gefixt. Allerdings funktioniert der Lautstärkeregler bei mir immer noch nicht.

Testing Maperitive

It's time for another post about a tool that is related to the Openstreemap (OSM) project. Yesterday, golem.de published a post about Maperitive, a cross-platform real-time OSM renderer that runs on .NET/Mono written by Igor Brejc. Maperitive is expected to become the successor of the Kosmos OSM rendering application. Instantly I felt the urge to give it a try, so I downloaded the latest release from here.

Because I never installed the mono development libraries, I had to take care of that: sudo aptitude install libgluezilla libmono-accessibility2.0-cil libmono-cecil-private-cil libmono-corlib1.0-cil libmono-data-tds1.0-cil libmono-dev libmono-i18n-west1.0-cil libmono-management2.0-cil libmono-peapi2.0-cil libmono-relaxng1.0-cil libmono-security1.0-cil libmono-system-data1.0-cil libmono-system-runtime1.0-cil libmono-system-runtime2.0-cil libmono-system-web1.0-cil libmono-system1.0-cil libmono-webbrowser0.5-cil libmono-winforms2.0-cil mono-2.0-devel mono-csharp-shell mono-devel mono-gmcs I'm listing all the dependencies here, actually it should suffice to add mono-devel and libmono-winforms2.0-cil, I guess. After that and doing a chmod +x Maperitive.sh, I could start the application.

After feeding the OSM data for Berlin to Maperitive with load-source /home/mattsches/temp/berlin.osm.bz2 it took a couple of seconds to render the actual map, but it worked! Keep in mind, however, that Maperitive is still under heavy development, so don't expect any comfortable GUI yet. All you have is a command line and a long list of text commands. But that's ok for me right now ;-) Here's two screenshots:

Maperitive Screenshot 1Maperitive Screenshot 2

I'm looking forward to future developments of Maperitive. If you want to check it out, too, make sure you're willing to report any bugs you encounter. Igor also set up a Google Group where you can share your thoughts and experiences.